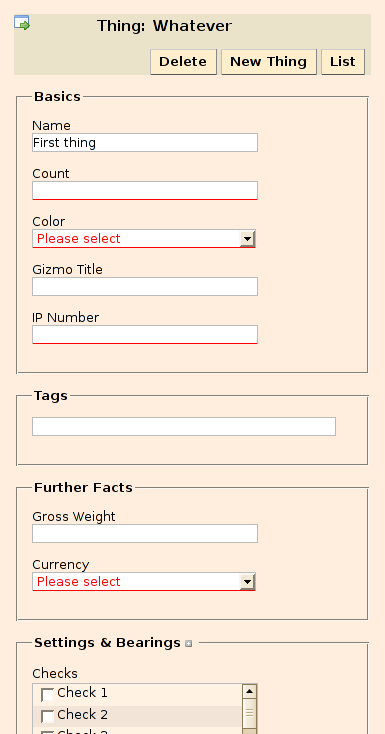
XML round-trip testing for Rails resources

I’ve recently started to add XML support to a Rails application, meaning that the application provides data in XML format, if the request asks for it, and it understands XML data on create or update.

To keep the application as well as myself sane, I’ve written a test that ensures the round trip of getting XML and updating an object by sending XML works. This is only a very basic test and there surely is more that can and should be tested.

class XmlRoundtripTest < ActionController::IntegrationTest

  RESOURCES = [
    :people, :things
  ]
  fixtures :stuff, *RESOURCES

  def self.assert_roundtrippability_for(*resources)
    resources.each do |resource|
      define_method("test_xml_roundtrip_for_#{resource}") do
        @user = user
        @user.logs_in

        xml = @user.gets_xml(resource)
        @user.changes_object_name!(xml)

        old_version = @user.extracts_lock_version(xml)
        @user.sends_xml(xml, resource)

        # Make sure that the resource was really updated
        new_version = @user.extracts_lock_version(@user.gets_xml(resource))
        assert_equal(old_version + 1, new_version)
      end
    end
  end

  assert_roundtrippability_for *RESOURCES

  def user
    open_session do |user|
      def user.gets_xml(resources, id = 1)
        get "/#{resources}/#{id}.xml"
        assert_response :success
        @response.body
      end

      def user.sends_xml(xml, resources, id = 1)
        put "/#{resources}/#{id}.xml", xml, :content_type => 'application/xml'
        assert_response :success
        @response.body
      end

      def user.changes_object_name!(xml)
        # arbitrarily change an attribute we know is there
        xml.gsub!(%r{<name>(.*?)</name>}, '<name>X\1Y</name>')
      end

      def user.extracts_lock_version(xml)
        xml =~ %r{<lock-version>(\d+)</lock-version>}
        $1.to_i
      end
    end
  end
end

Bash Completion for the gem Command

The gem command is the command line user interface to the RubyGems system for managing Ruby packages.

This command has a few sub-commands itself and a long list of options that differ per sub-command. Remembering and typing them can be tedious, but thankfully, if you are using the bash command shell, it can help with this task. It only has to be told how.

I’ve packaged the how in this file. Copy it to /etc/bash_completion.d and hope that your bash installation picks it up the next time you start a shell.

On Debian/Linux system that’s just how it works. If this does not work on your particular version of Linux or Unix, you’ll have to look up how completions are handled on your system.

Looking good at any (font and window) size

Make your layout look good a different screen and font sizes.

What it looks like

Example 1,
Example 2.

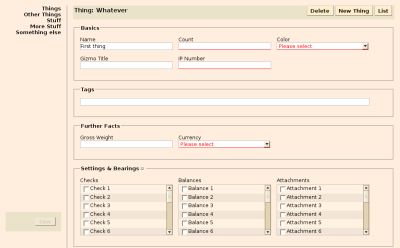
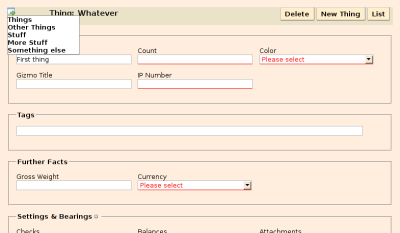
Here’s what the form example (example 1) is supposed to look like.

At 1024 x 768 pixels, the navigation links and Save button are positioned fixed in a column to the left.

large layout

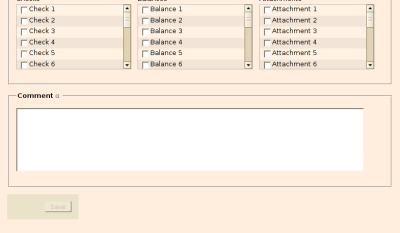
At 800 x 600 pixels, the navigation links are only shown on hover over the icon in the top-left corner; the Save button is tucked under the form itself.

large layout
large layout

What you need

Grab layout.js.

You also need Prototype.js.

What you need to do

Include the scripts in your page.

<script src="javascripts/prototype.js" type="text/javascript"></script>
<script src="javascripts/layout.js" type="text/javascript"></script>

Activate layout switching in the head of your page

<script type="text/javascript">
//<![CDATA[
Event.observe(window, 'load', function() {
  Layout.initialize({observeFontSize: true});
});
//]]>
</script>

Most likely, the default size thresholds set in layout.js won’t fit your needs. See the file itself for how to set them to different values.

(Re-)Write your stylesheets so that they make use of the size information. As an example, here’s the CSS I use for styling the navigation list on the two example pages.

#navitrigger {
  display: none;
}

#navigation {
  position: fixed;
  top: 0em;
  left: 0em;
  margin: 1em;
  padding: 0;
  text-align: right;
  z-index: 10;
}

#navigation ul {
  width: 10em;
  margin: 0;
  padding: 0;
  list-style-type: none;
}

#navigation li {
  font-weight: bold;
}

#navigation .current {
  display: block;
  width: 100%;
  color: #bbb;
  background-color: #ffecac;
}

#navigation li.admin {
  border-top: 1px solid #bbb;
}

#navigation li a {
  display: block;
  width: 100%;
}


body.small #navigation {
  position: absolute;
  text-align: left;
  z-index: 30;
}

body.small #navigation ul {
  display: none;
  background: #fff;
  border: 1px solid #888;
}

body.small #navitrigger {
  display: block;
  font-size: 150%;
  font-weight: bold;
}

body.small #navigation:hover ul {
  display: block;
}

Return of the Tag Cloud — ajaxing the tagged

On my continuing quest to become more Web-2.0-ish, I’ve tried my luck tilting at… well, tag clouds. To get an idea what I’m talking about, please have a look.

These are the rudimentary basics to create a tag cloud like that.

In the controller

def tags
  @popular_tags = Tag.find_most_popular(:limit => 30)
end

In the view

<ul id="tags" class="tagcloud">
<% @popular_tags.sort_by(&:name).each do |t| -%>
  <%= weighted_tag t, tag_options %>
<% end -%>
</ul>

or, to get a somewhat nicer look, and to demonstrate some of the options

<%
  tag_options = {
    :wrap => ['li', '<span class="dlm">[</span>', '<span class="dlm">]</span>'],
    :min_size => 100, :max_size => 500,
    :link_options => { :class => 'tag' })
  }
-%>
<h2>Tags</h2>
<ul id="tags" class="tagcloud">
<% @popular_tags.sort_by(&:name).each do |t| -%>
  <%= weighted_tag t, tag_options %>
<% end -%>
</ul>

Here you can download a do-it-yourself kit of all the pieces.

Form Layout

I’ve looked at quite a lot of examples of form layout over the past two years. Invariably the demonstrations looked very pretty and were pretty primitive. Usually, all the input elements are lined up in a single column; labels are either stuck on top of the inputs or prepended to them. This is all well for simple forms or a succession of forms chained together in wizard-style. It is less appealing for web-based applications targetted at proficient users who interact with them frequently.

Ground Rules

  • Tables only where they are semantically meaningful.
  • As much independence as possible from specific window or font sizes.
  • Efficient use of available space.
  • Horizontal and vertical alignment to columns.

Here’s my entry.

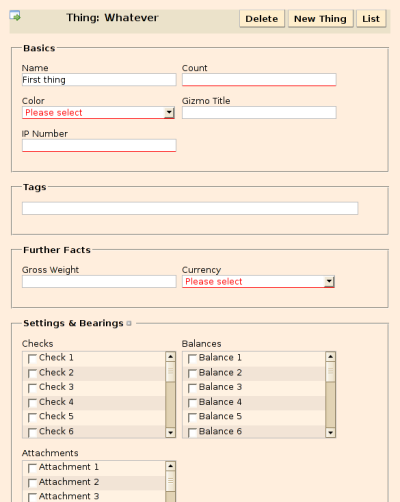
For those with impaired browsers, here’s what it looks like at various widths.

800 pixels
large layout

600 pixels
large layout

400 pixels
large layout

The relevant part of the boilerplate.css stylesheet isn’t even overly long.

Posted in CSS

Popular Requests

It was late last night. And the night before, I admit it. I also admit that I don’t know much about what Web 2.0 is all about, but there are two things that I do know: rounded corners are involved and, of course tags and tag clouds.

Tagging is work, therefore ipso facto to be avoided, better still: automated.

Let’s say you want to show people which part of your site are popular. How about a tag cloud of the most requested locations? Well, the first thing to do would be to collect which requests are happening at all. Also, you’d need to attach a sensible, displayable title to the raw request. For the sake of this little demonstration, I’m going to assume that in your template — list.rhtml, edit.rhtml, and brethren — you have an instance variable @title. It could be either defined in the template itself or transplanted there from its controller, it doesn’t matter.

Given all this, you could hypothetically write code like this.

class ApplicationController < ActionController::Base
  collect_popular_requests :max_age => 7.days, :max_count => 10000,
    :title => proc { |controller| controller.response.template.instance_variable_get(:@title) }

Therein further assuming that at most the 10000 most recent requests are kept if they are no older than 7 days. Now that we have hypothetically collected the data to base our tag cloud on, we have to display it somehow. Again, let's assume it could be done with a route like this

map.popular '/', :controller => 'most_popular', :action => 'index'

a controller like that

class MostPopularController < ApplicationController
  helper BoilerPlate::PopularRequestsHelper
  collect_popular_requests :\off # Ignore this place

  def index
    @popular_requests = popular_requests_list.most_popular(30)
  end
end

and for good measure a view (index.rhtml)

<ul class="tagcloud">
<% alpha_reqs = @popular_requests.sort_by(&:title) -%>
<% alpha_reqs.each do |req| -%>
  <%= popular_request_tag(req, :wrap => 'li', :min_size => 30, :max_size => 400) %>
<% end -%>
</ul>

and some CSS for good style

.tagcloud {
  text-align: center;
  width: 70%;
}
.tagcloud li {
  display: inline-block;
  display: -moz-inline-box;
  white-space: nowrap;
  vertical-align: middle;
  line-height: 1.2em;
  padding: 0 0.2em;
}

Well, if you've made it this far, you might even consider doing all of this for real. For a good start, I suggest you download this Rails plugin, install it, create a database table with

$ script/generate popular_requests AddPopularRequests
$ rake db:migrate

and start playing.

Self-conscious Decoration

Variations on the Decorator Design Pattern in Ruby have already been discussed in several places. For my special purpose, none of these approaches works.

The common problem with a decorator based on delegation is the lost sense of self. Method calls of the decorated object to itself are not routed through the decorator, therefore remain woefully undecorated.

The Ruby idiom of aliasing and redefining methods, in effect adding around advice, is possible, when the decoration applies to all uses of the “core” class. It is not suitable when you need decorated as well as undecorated variants.

There’s an almost classical: Just derive a subclass from the “core” class and add the decoration in there. Doing this explicitly is tedious, ugly, and multiplies classes semper necessitatem. Luckily, for us and poor, overquoted Father Ockham, Ruby is a highly dynamic language where things are possible that users of other languages can only dream of (longingly or in nightmares, that’s quite a different issue).

So, without further ado, here’s a simple demonstration of the technique.

class Core
  def m1
    puts "Core#m1"
  end

  def m2
    puts "Core#m2"
    m3
  end

  def m3
    puts "Core#m3"
  end

  def m4
    puts "Core#m4"
  end
end

class Decorator
  class << self
    def new(*args)
      decorate(Core).new(*args)
    end

    private
    def decorate(klass)
      decorated_class = Class.new(klass)
      decorated_class.send(:include, Decoration)
      decorated_class
    end
  end

  module Decoration
    def m1
      puts "Decorator#m1"
      super
    end

    def m2
      puts "Decorator#m2"
      super
    end
    def m3
      puts "Decorator#m3"
      super
    end
  end
end

With that under under our collective belt, here’s the case that motivated my attempt at self-conscious delegation. In a Rails application, I have several layers of FormBuilders. At the base, derived from ActionView::Helpers::FormBuilder is a form builder that provides mechanisms. For example for adding labels to input elements and for automatically displaying appropriate widgets for various association types. On top of that, I have two form builders that add layout specifics; one for CSS-based layouts, one for table-based layouts. I still need a further layer for policy: only show users what they are allowed to see and touch. This last policy layer is, of course, independent of layout (and vice versa!), therefore, short of full-fledged AOP, decoration was the way to go.

class DecoFormBuilder

  class << self
    def new(object_name, object, template, options, proc)
      delegate_class = options.delete(:delegate_builder)
      raise ArgumentError, 'No :delegate_builder given to DecoFormBuilder' unless delegate_class
      decorate(delegate_class).new(object_name, object, template, options, proc)
    end

    private

    def decorate(klass)
      decorated = Class.new(klass)
      decorated.send(:include, Decoration)
      decorated
    end
  end

  module Decoration
    def initialize(object_name, object, template, option, proc)
      super
      # Do whatever initialization you need here
    end

    # Put the decorating methods here and don't forget to
    # call super.

  end
end

Rails valid markup testing

Coda Hale has given the intersection of the Rails and web standards communities a very nice plugin for keeping your markup clean. It is aptly, if slightly pretentiously, named Responsible Markup.

But let’s be honest, do you really want to spend much time on writing tests for your markup? After all, it’s taking long enough to get the markup right. Ruby to the rescue! Why write tests when we can get Ruby to write them?

Here’s what I’m using.

class ValidMarkupTest < Test::Unit::TestCase
  ResponsibleMarkup::validator_uri = 'http://localhost/w3c-markup-validator/check'

  def self.validate_markup_for_resources(*resources)
    default_actions = {
      :index => { :method => :get, :template => 'list' }, 
      :new   => { :method => :get, :template => 'new' },
      :edit  => { :method => :get, :id => 1, :template => 'edit' }
    }
    if resources.last.kind_of?(Hash)
      actions = resources.pop
      actions.each do |action, options|
        options.reverse_merge!(default_actions[action] || {})
      end
    else
      actions = default_actions
    end

    resources.each do |resource|
      fixtures resource

      controller_class = "#{resource.to_s.camelize}Controller".constantize

      actions.each do |action, options|
        options = options.dup

        define_method("test_action_#{action}_for_#{resource}_returns_valid_markup") do
          @controller = controller_class.new

          request_method    = options.delete(:method)
          expected_template = options.delete(:template)

          send(request_method, action, options)

          assert_response :success
          assert_template expected_template
          assert_valid_markup
        end
      end
    end
  end

  validate_markup_for_resources :thingamuhjigs, :humdingers, :gizmos

  def setup
    @request  = ActionController::TestRequest.new
    @response = ActionController::TestResponse.new
    login_test_user
  end

  def assert_valid_markup
    assert_doctype(:xhtml_10_strict)
    assert_content_type
#    assert_compatible_empty_elements
    assert_no_empty_attributes
    assert_no_long_style_attributes
    assert_unobtrusive_javascript :allowed => [ :inline_events, :blank_hrefs ]
    assert_valid_html
  end

end

The idea is to have separate the testing task into three parts.

  • A generic, lightly configurable, method for defining tests: validate_markup_for_resources
  • A setup method that is specific to your application. In the example above, I need to login a user.
  • A assert_valid_markup method that contains assertions for your validation goals.

Configuration

By default, validate_markup_for_resources generates tests for index, new, and edit actions. For the edit test, it assumes that an object with the id 1 exists. If you need to change the request options used by default, you can override them like this

validate_markup_for_resources :gizmos, :id => 2, :template => 'gizmo', :\other_param => 'xyz'

Running

Normally, by Rails convention, the above example test would belong in test/functional. However, even when using a validator installed on the local machine, it takes quite some time to run. So, in order not to slow down my functional tests too much, I’ve created a new directory, test/markup and run the tests in there with

$ rake test:markup

This rake task is provided by the following snippet in lib/tasks/markup.rake.

namespace :test do
  desc "Run the checks for valid markup defined in test/markup"
  Rake::TestTask.new(:markup => "environment") do |t|
    t.libs << "test"
    t.pattern = 'test/markup/**/*_test.rb'
    t.verbose = true
  end
end

Incidentally, yes, I know that the markup of this blog is broken. Blame WordPress.

Timestamping files from commandline and Konqueror

In order to keep multiple versions of a file, I sometimes add a timestamp to the filename. Doing this by hand is tedious and error-prone, but this chore can be automated by a small shell script.

/usr/local/bin/timestamp

#! /bin/sh

for oldname ; do
  ts=`date +'%Y%m%d%H%M' --reference="$oldname"`

  newname=`echo $oldname | sed -nre "s/^(\\.?)([^\\.]+)(-[[:digit:]]{12})(\\..*)\$/\\1\\2-$ts\\4/p"`
  if [ -z "$newname" ]; then
    newname=`echo $oldname | sed -nre "s/^(\\.?)([^\\.]+)(\\..*)\$/\\1\\2-$ts\\3/p"`
  fi
  if [ -z "$newname" ]; then
    newname=`echo $oldname | sed -nre "s/^(\\.?)([^\\.]+)(-[[:digit:]]{12})\$/\\1\\2-$ts/p"`
  fi
  if [ -z "$newname" ]; then
    newname=`echo $oldname | sed -nre "s/^(\\.?)([^\\.]+)\$/\\1\\2-$ts/p"`
  fi

  if [ -f "$newname" ]; then
    if [ "$newname" != "$oldname" ]; then
      echo "Can't rename $oldname to $newname: file already exists."
    fi
  else
    echo mv "$oldname" "$newname"
    mv "$oldname" "$newname"
  fi
done

As I’m using KDE as my desktop, I like to have the timestamping integrated. Fortunately, it’s easy.

~/.kde/share/apps/konqueror/servicemenus

Actions=timestamp
ServiceTypes=all/all

[Desktop Action timestamp]
Exec=/usr/local/bin/timestamp %u
Icon=clock
Name=Timestamp

See Creating Konqueror Service Menus for a general introduction.

Update, 2007-02-06

I’ve updated the script to insert the timestamp before all the first extension and to also work with filename starting with a ‘.‘.

ActiveRecord Enumerable

Ever wanted to iterate over a huge number of objects and found
that find(:all) doesn’t cut it? Then this plugin
might be for you. Install it with

$ script/plugin install svn://rubyforge.org/var/svn/ar-enumerable/ar_enumerable/trunk

First, a note of caution. This plugin has not seen much practical
use yet, in its current state it is only slightly above a
proof-of-concept. There are several tests included that cover most
of the functionality. If you intend to use this plugin, please
make sure to independently check that it does what you want.

Enumerating ActiveRecord objects

Let’s start with a boring example, to get the general idea

Person.where(['lastname = ?', 'Smith']).map(&:firstname)

Slightly more interesting

Person.where(['lastname = ?', 'Smith']).inject(0) do |income, person|
  income += person.income
end

siblings = Person.where(
    ['lastname = ?', 'Smith'], 
    :include => :siblings).inject([0, 0]) do |memo, person|
  memo[0] += person.siblings.count
  memo[1] += 1
  memo
end
siblings[0].to_f / siblings[1]

The point here is that your database may contain millions of Smiths,
for what it’s worth, the entire population of the earth could have
turned into Smiths, still, only a limited number of them would be
loaded into memory at the same time.

Internally, enumeration works in two completely different ways.
By default, a chunk of objects is retrieved from the database using
OFFSET and LIMIT clauses. This way is supported by all databases,
however it can be slow.
Therefore, the preferred alternative is to use a standard SQL cursor
for iterating over the result set of a query. It would simply look like
this

Person.where(['lastname = ?', 'Smith'], :use_cursor => true).inject(0) do |income, person|
  income += person.income
end

A further parameter is how many records (or rows, in the case of cursors)
are fetched from the database in one access. The default is 1000. You can
set it explicitly like this

Person.where(['lastname = ?', 'Smith'], :fetch_count => 100).inject(0) do |income, person|
  income += person.income
end

Performance Considerations

Some informal tests suggest that for large result sets without
included associations cursor-based enumeration can be faster than
OFFSET/LIMIT-based enumeration by a factor of 3 to 5.
When associations are included, things become more blurry. In this
case, cursor-based enumeration imposes an ordering on the result
set that can slow down things considerably.
The fetch count has considerable influence on performance, basically,
you can buy speed by spending memory.